QMK on Keychron K-series Keyboards
What is QMK, and why would I want it? The tale of the almost perfect keyboard
Quantum Mechanical Keyboard (QMK) is a keyboard firmware providing basically endless customisation.
I have a Keychron K2v2, and I love everything about it except that it has a few (imo) MAJOR flaws. If it weren’t for these flaws, I would consider it the perfect keyboard.
I use the Insert key a lot, but for whatever reason, they decided that Insert wasn’t worth its own key and made Insert accessible via Fn + Delete This is really really annoying because I use Ctrl + Insert and Shift + Insert all the time. Its super annoying for shortcuts to suddenly become three key shortcuts, having to press Ctrl + Fn + Delete to copy and Shift + Fn + Delete to paste, and I know I can just right-click or do any other method of copying and pasting, but that’s not the point. I want Insert as its own key.
Keychron also commited another (possibly worse) sin: They have an LED key where Delete should be. Arrrggh! It drives me nuts! Every time I press Delete I change my keyboards backlight mode. There are ways to lock the LED mode, but that doesn’t magically fix my years of muscle memory.
For the record, I don’t think the blame is entirely on Keychron, they don’t seem to have any in-house firmware engineers and the firmware was outsourced. I will give them the benefit of the doubt and, maybe, if they did it themselves, they would have made the LED key remappable 🤷♂️.
One key I never ever use anymore is Print Screen (now that Win + Shift + S exists). So for a while, I remapped Print Screen to Insert, and Shift + Print Screen to Print Screen (just in case I needed it for whatever reason).
But that didn’t solve the stupid placement of the LED key. That’s where QMK comes in. I had read so many places that QMK was not possible on the Keychron K-series, Keychron only supporting QMK on their far more expensive Q-series boards.
This isn’t the case. Courtesy of the Sonix Keyboard Hacking Community, who have ported QMK to a bunch of previously unsupported keyboards - like the Keychron K2 😁.
With QMK, I was able to remap the LED button, fixing the Keychron K2’s worst feature and go even further with customisation. At last I was able to have a dedicated Insert key, and a Delete key in its rightful place as the Gods of Thock intended.
There was one sacrifice I had to make, however, and it may not be for everyone…
Foreword
This guide will involve some removal of keycaps, so have a keycap puller ready, and some shorting of pins, so have some metal tweezers at your disposal, and will involve the flashing of custom, technically unsupported, firmware on your keyboard. The chances of bricking your typing apparatus are very slim, but just know that this will probably void your warranty.
At the time of writing this guide, Sonix don’t have Bluetooth functionality working either. This is the sacrifice I alluded to in the previous section. I personally don’t think I need Bluetooth, but if you need Bluetooth, then I’m sorry for your loss (of Insert key).
I should also mention that Sonix have got other K-series keyboards working, YMMV, but at the time of writing they support the following K-series keebs:
- K2
- K3
- K4
- K6
- K7
- K8
- K12
- K14
The last thing I want to say here is that I have only done this with the K2v2 so if you are going to follow the guide for one of the other models, some things may not line up and you may be better off looking elsewhere for a guide specifically suited to your Human Input Device of choice. That being said, all the guides I’ve read seem to tell you to do pretty much the same thing.
This guide also assumes you will be using Windows.
Prerequisites
You will need to download and install the following:
- Sonix Flasher
- Windows Subsystem for Linux 2 with Ubuntu
Preparing the Build Environment
Note: If any of the required dependencies are missing (make, git etc.), you will need to install these packages.
- Log into WSL and run the following to clone the Sonix QMK Firmware repository:
git clone https://github.com/SonixQMK/qmk_firmware.git
cdinto theqmk-firmwaredirectory and pull the required Git submodules:
cd qmk-firmware
make git-submodule
- Finally, run the
qmk_installscript to prepare the build environment:
util/qmk_install.sh
Building the QMK Firmware
These steps will differ based on whether you have an ANSI or ISO layout keyboard, the command examples will assume you are using an ANSI layout keyboard, but if you are using an ISO layout, simply replace ANSI with ISO.
- Build the firmware with your keymap of choice (this guide will not go into detail about making keymaps):
qmk compile -kb keychron/k2/rgb -km ansi
The -kb parameter is used to specify which keyboard to use from the /keyboards/ directory and the -km parameter is used to specify which keymap to use from the /keymaps/ directory in your respective keyboard’s directory.
- Move the generated
.binfile somewhere meaningful, the bin file can be found in the root of the/qmk-firmwarefolder.
Note: You can access your WSL2 file structure in Windows 11 by entering
\\wsl.localhost\Ubuntuin Explorer’s address bar.
Flashing the Firmware
Entering Bootloader Mode
Ensure your keyboard is in cable mode for the remainder of this guide.
We will need to enter bootloader mode to flash QMK. To enter bootloader mode, remove the Space bar from your keyboard to reveal a small part of exposed PCB. On this exposed part of the PCB is two small holes labeled BOOT.
Unplug your keyboard and use your metal tweezers to short the two pins.
Replug your keyboard and open the Sonix Flasher software we installed earlier.
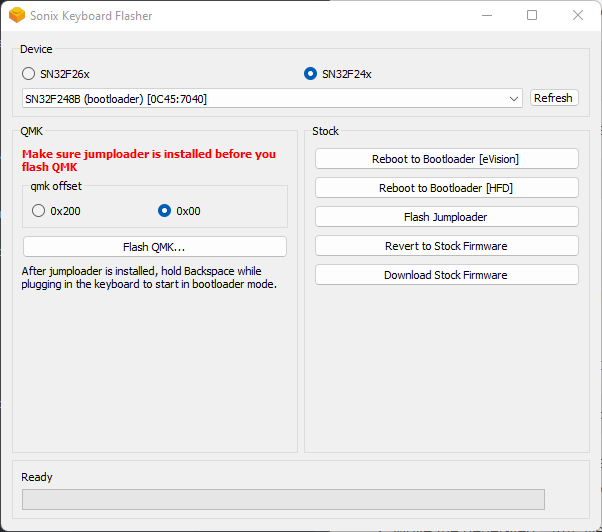
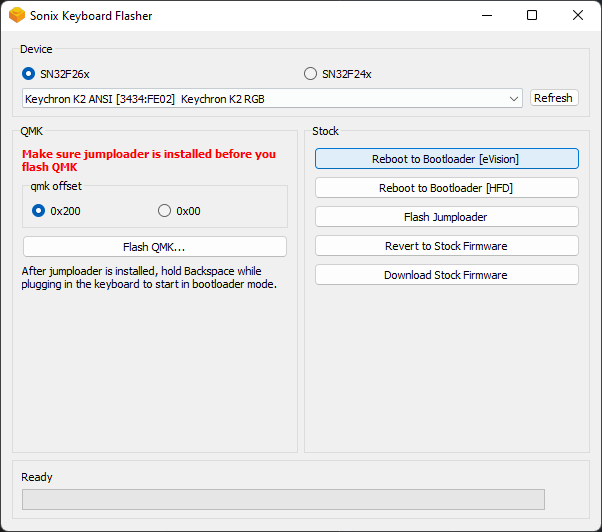
You should see SN32F248B (bootloader) in the detected device list and the SN32F24x radio button should be selected.
- You may now remove the tweezers and put the spacebar back on.
The Actual Flashing Part
Ensure the QMK Offset value is set to 0x00, press Flash QMK… and select the bin file from earlier. QMK will be flashed immediately on selection so please be careful here.
Your keyboard will reboot and clicking refresh in Sonix Flasher should show your device:
And that’s it! You have successfully installed QMK on your Keychron K-series keyboard!
QMK + VIA
VIA is probably the reason you want QMK. It is a tool that allows you to remap your keyboard, assign macros and control your LEDs.
Adding VIA Support
If you want this ability, you will need to flash a keymap with the following added to its rules.mk file:
VIA_ENABLE = yes
The rules.mk file for your keymap can be found in the qmk-firmware/keyboards/keychron/<keyboard-model>/keymaps/<keymap-of-choice>/ folder.
After adding the aforementioned line to the rules.mk file, follow the steps in the Using VIA section.
Using VIA
Once your keyboard has been flashed installed, open the VIA app. You will notice that VIA is “searching for devices” forever.
Navigate to the
qmk-firmware/keyboards/keychron/<keyboard-model>/keymaps/viafolder and locate the JSON file for your keyboard.Make a copy of this file somewhere sensible, it probably currently doesn’t support your Keyboard’s lighting.
Copy this into the JSON file you just copied to enable lighting support:
	"lighting": {
		"extends": "qmk_rgblight",
		"underglowEffects": [ [ "None", 0 ], [ "SOLID_COLOR", 1 ], [ "ALPHAS_MODS", 1 ], [ "GRADIENT_UP_DOWN", 1 ], [ "GRADIENT_LEFT_RIGHT", 1 ], [ "BREATHING", 1 ],
      		[ "BAND_SAT", 1 ], [ "BAND_VAL", 1 ], [ "BAND_PINWHEEL_SAT", 1 ], [ "BAND_PINWHEEL_VAL", 1 ], [ "BAND_SPIRAL_SAT", 1 ], [ "BAND_SPIRAL_VAL", 1 ], [ "CYCLE_ALL", 1 ], [ "CYCLE_LEFT_RIGHT", 1 ],
      		[ "CYCLE_UP_DOWN", 1 ], [ "CYCLE_OUT_IN", 1 ], [ "CYCLE_OUT_IN_DUAL", 1 ], [ "RAINBOW_MOVING_CHEVRON", 1 ], [ "CYCLE_PINWHEEL", 1 ], [ "CYCLE_SPIRAL", 1 ], [ "DUAL_BEACON", 1 ], [ "RAINBOW_BEACON", 1 ],
      		[ "RAINBOW_PINWHEELS", 1 ], [ "RAINDROPS", 1 ], [ "JELLYBEAN_RAINDROPS", 1 ], [ "HUE_BREATHING", 1 ], [ "HUE_PENDULUM", 1 ], [ "HUE_WAVE", 1 ], ["PIXEL_FRACTAL", 1], ["PIXEL_RAIN", 1],
      		[ "TYPING_HEATMAP", 1 ], [ "DIGITAL_RAIN", 1 ], [ "SOLID_REACTIVE_SIMPLE", 1 ], [ "SOLID_REACTIVE", 1 ], [ "SOLID_REACTIVE_WIDE", 1 ], [ "SOLID_REACTIVE_MULTIWIDE", 1 ], [ "SOLID_REACTIVE_CROSS", 1 ],
      		[ "SOLID_REACTIVE_MULTICROSS", 1 ], [ "SOLID_REACTIVE_NEXUS", 1 ], [ "SOLID_REACTIVE_MULTINEXUS", 1 ], [ "SPLASH", 1 ], [ "MULTISPLASH", 1 ], [ "SOLID_SPLASH", 1 ], [ "SOLID_MULTISPLASH", 1 ] ],
      		"supportedLightingValues": [ 128, 129, 131 ]
	},
Click on the Design tab in VIA and drag and drop your modified JSON file on the Import icon.
Navigate back to the Configure tab and you should be greeted with your keyboard’s default mapping.
You may now customise your keyboard to your heart’s content.
I recommend saving any changes made and storing them somewhere sensible.
If the Configure tab still shows “searching for devices”, go to the VIA is still searching for devices section, otherwise Congrats, You now have a perfect keyboard!
VIA is still searching for devices
This was pretty annoying, this happened to me. I must have flashed my keyboard 10+ times before I asked for some advice on the Sonix discord server.
A helpful user explained to me that later commits of the QMK firmware broke VIA (keep in mind this was at the time of writing, it could be fixed now! If it’s fixed, you’re probably not even reading this bit…)
- Checkout the following qmk-firmware commit and make the git submodules again:
cd ~/qmk_firmware
git checkout 96d0671481abb3b9c751a1e35b558a86c55d9d92
make git-submodule
There is a bug in this commit of the QMK Tools where your firmware cannot be built as the
/keyboards/directory is too large. To remedy this, delete all other makes of keyboards from that directory except for Keychron.Finally, follow the steps in the Building the QMK Firmware section and then flash the firmware.
The extra work should have paid off as you now should have a perfect keyboard!